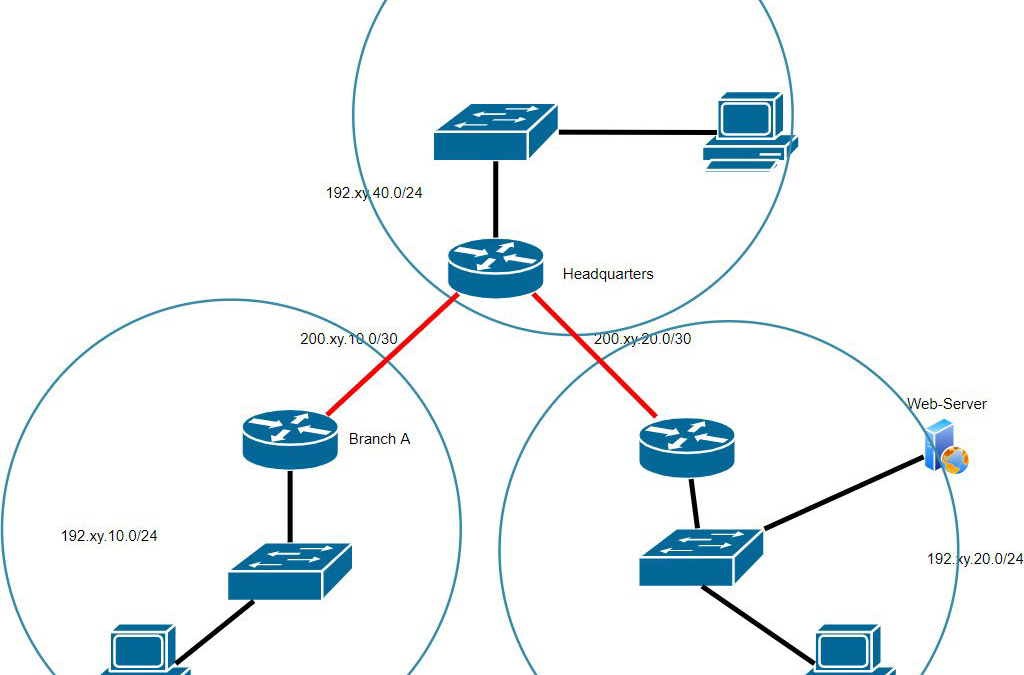
Overview:
This lab provides you the hands-on practice for Configuring Routing Protocols the routing between the different networks. For this lab, review the concepts of a static route, RIP Routing, and OSPF Routing and their configuration steps.
This is an individual exercise. It is divided into three parts. Each part carries equal weightage for evaluation.
Topology:

TELE33324 Lab: Routing Protocols.v3/2022
PART A.
Configure a static route between the Headquarter, Branch A, and Branch B.
Steps:
- Create the topology. Use a naming convention for all objects as yourinitials_last two digits of studentID_objectname_number
- Configure the appropriate IP addresses to all the connected objects. Replace the XY characters with the last two digits of your Student_ID. [Determine the address block and then assign the valid addresses]
- Create a plan for the static routing configuration. Write down the commands to configure.
- Configure the Routers accordingly.
- Check the connectivity from Branch 1 to Branch 2 Network {ping from PC in branch 1 to PC in branch 2
- Verify the routing table [Use command ‘show IP route’]
- Take the snapshot of the routing table.
- Summarize your work in 2-3 sentences and reflect on the configuration done. Discuss the benefits of using the static route and the scenario where you will prefer this routing.
PART B.
Configure a RIPv2 route between the Headquarter, Branch A, and Branch B.
Steps: - Create the topology. Use a naming convention for all objects as yourinitials_last two digits of studentID_objectname_number
- Configure the appropriate IP addresses to all the connected objects. Replace the XY characters with the last two digits of your Student_ID. [Determine the address block and then assign the valid addresses]
OR
You can use the topology created before provided you change the administrative distance of static routing from 1 to 140. - Create a plan for the RIPv2 routing configuration. Write down the commands to configure.
- Configure the Routers accordingly.
- Check the connectivity from Branch 1 to Branch 2 Network {ping from PC in branch 1 to PC in branch 2
- Verify the routing table [Use command ‘show IP route’]
- Take the snapshot of the routing table.
- Analyze the RIP Protocol [Use command ‘show IP protocols’]
- Take the snapshot of the output of Step 8.
- Summarize your work in 2-3 sentences and reflect on the configuration done. Discuss the issues that are associated with RIP Routing. What is the purpose of different timers and their values?
3
TELE33324 Lab: Routing Protocols.v3/2022
PART C.
Configure a single area OSPF route between the Headquarters, Branch A, and Branch B.
Steps: - Create the topology. Use a naming convention for all objects as yourinitials_last two digits of studentID_objectname_number
- Configure the appropriate IP addresses to all the connected objects. Replace the XY characters with the last two digits of your Student_ID. [Determine the address block and then assign the valid addresses]
OR - You can use the topology created in PART B.
- Create a plan for the OSPF routing configuration. Write down the commands to configure.
- Configure the Routers accordingly.
- Check the connectivity from Branch 1 to Branch 2 Network {ping from PC in branch 1 to PC in branch 2
- Verify the routing table [Use command ‘show IP route’]
- Take the snapshot of the routing table.
- Analyze the OSPF Protocol [Use command ‘show IP protocols’]
- Take the snapshot of the output of Step 7.
- Analyze the database [Determine which command you will use to complete this task]
- Take the snapshot of the output of Step 9.
- Summarize your work in 2-3 sentences and reflect on the configuration done. Discuss the benefits of using the OSPF routing protocol. What is the purpose of LSA and what are the different types of LSAs can exists? Which router is elected as a DR, discuss its election process?
Instructions for the submission:
You are required to create a professional report document that justifies that you have completed the lab. At the minimum, the report must include the following sections. - Introduction: Discuss the purpose/objective of the Lab.
- Design of topology: Discuss the IP addressing scheme in tabular form. Create a diagram showing the topology with the finalized naming convention of the objects and IP addresses.
- PART A /PART B/PART C:
For each Part provide the following subsections
3.1. Configuration Successful: Yes /No (Mention the issue faced)
3.2. Screenshots: Complete the configuration and perform the analysis of outputs. Highlight the relevant output on the screenshots.
4
TELE33324 Lab: Routing Protocols.v3/2022
3.3. Summary: Summarize the tasks and answer the asked questions. - Conclusion: Write 2-3 sentences to conclude the lab and convey your understanding of the Routing Protocols.
- References: Provide the references according to the APA Format.
Add page number and your name/student ID/your class number as a Footer in the document. Submission:
Submission will include the report document along with the .pkt files. Do not put your submission in zip folder.
Naming Convention for the report document is yourname_studentID_Lab2 and for the packet tracer Files, yourname_studentID_Lab2_Simulation.
You are required to submit - Report Document
- Packet Tracer Files
Rubric:
Maximum Score: 50
Document Requirements Completed 5
Design 5
Configuration Completed Successfully 15
Summary 5
Answers provided to questions 15
Packet Tracer Files Submitted 5

